多视图 (multi-view images),是三维物体一种表现形式,多视3D形状识别 (multi-view 3D shape recognition) 这一问题在学术界 备受关注。当前评测多视3D形状识别,经常用到的数据集有 ModelNet40, RGBD, ScanObjectNN 等。其中 ModelNet40 最常见形式是点云, 渲染好的多视图版本在网络上能比较容易找到。 RGBD 在发布时就提供了多视图版本,所以也很方便使用。
问题在于 ScanObjectNN,它是香港科技大学研究团队在 ICCV 2019 发布的一个点云数据集,但目前很难找到渲染好的多视数据版本。 由于该数据集在3D领域比较知名,也具有一定挑战性,对于 multi-view 3D shape analysis 方向的文章, 领域顶会/顶刊审稿人希望看到作者在这样的数据集进行评测。现实问题是很难获取 ScanObjectNN 多视图数据集, 至今也没有公开的数据可供下载,想做这部分实验只能自己从头渲染,要了解点云到多视的生成原理, 要学习3D软件的使用,要写批量处理的脚本,要调很多bug,难度和门槛还是有的。
为了解决这一痛点,笔者花了一段时间将渲染点云生成多视图的原理和过程搞清楚了,并成功生成了ScanObjectNN多视数据集, 这篇博客将其中关键点和操作步骤记录下来,供大家学习使用。若要得到其他点云的多视图,按照这个流程操作即可。
ScanObjectNN 多视数据集
- 把最重要的放前面,渲染好的 ScanObjectNN 多视数据集传到了百度网盘,提取码:y1fj
环境配置
- Windows 10
- Git Bash
- MeshLab 2020.07
- 版本要小于 2020.12,因为该版本及其以后不支持
meshlabserver,这在渲染中是要用到的 - 将安装目录添加到环境变量,如
C:\Software\MeshLab- 渲染脚本用到
meshlabserver.exe
- 渲染脚本用到
- 版本要小于 2020.12,因为该版本及其以后不支持
- Miniconda3
- 将安装、脚本目录添加到环境变量,如
C:\Software\miniconda3C:\Software\miniconda3\Scripts- Git Bash 使用 miniconda3
- 建立虚拟环境并安装必要软件
  conda init bash
  conda create -n mv_render python=3.7
  pip install meshlabxml
- 将安装、脚本目录添加到环境变量,如
原理和操作:点云 -> 多视图
- 点云是稀疏的点集,无法直接生成对应图像,需要先转换成 mesh 再渲染得到图像
- mesh 就是多边形网格体,形成三维物体表面,用相机从不同角度投影,就能得到三维物体多视图
- 转换成mesh步骤:
- 若点云只包含点的坐标,不包含法向量,需要用 MeshLab 计算每点法向量
- 点击菜单栏Filters -> Normals, Curvatures and Orientation -> Compute Normals for Point Sets
- 若点云数据包含每点法向量,跳过第一步,直接进入下一步
- 用 MeshLab 重建点云表面
- 点击菜单栏Filters -> Remeshing, Simplification and Reconstruction,有3种方法
- Screened Poisson Reconstruction
- Ball Pivoting Reconstruction
- VCG Reconstruction
- 点击菜单栏Filters -> Remeshing, Simplification and Reconstruction,有3种方法
- 在 MeshLab 导入一个想渲染的点云,把上一步中重建表面的Filter应用一下,生成它的表面
- 这一步操作有3个目的
- 确认点云放到 MeshLab 显示正常,格式没有问题,能够重建出表面
- 无误后,将重建表面的Filter 转换成script,这是$\color{red}{更重要的目标}$
- 通常来说渲染的点云不可能是一个,会是很多个,用手工处理不是解决方案,正确的做法是用脚本批量处理
- 操作如下
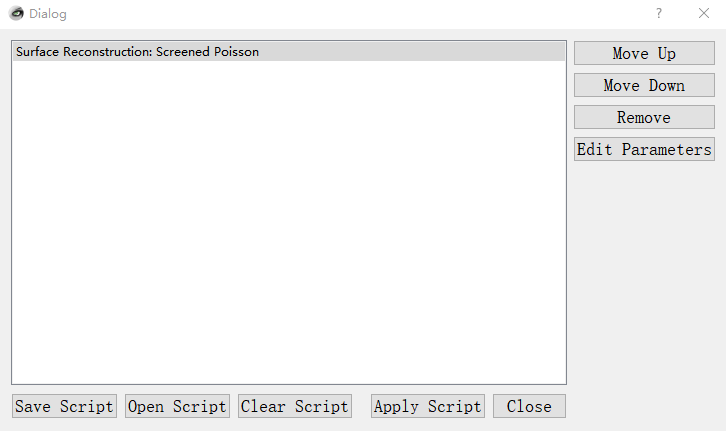
- 点击菜单栏Filters -> Show current filter script,会出现一个对话框
- 仅保留刚才选择的重建方法,将其他script删去,如下图所示
- 保存重建脚本,例如
poisson_surface_reconstruct.mlx,注意文件后缀为.mlx
- 如果 重建表面前 需要用 Filter 计算法向量 Normals,按照上述步骤操作,保存
.mlx即可
- 这一步操作有3个目的
- 准备
.ply点云数据- 以
ScanObjectNN数据集为例,原始数据存储与.bin文件,不能直接被 MeshLab 处理,这里将它转换为点云常用文件格式.ply- 转换脚本命名为
convert_bin_to_ply.py,具体实现参考 批量处理脚本章节
- 转换脚本命名为
-
将转换成的 .ply 点云文件放到统一目录下,如
ScanObjectNN_plyn_files(plyn命名代表带有法向量的点云) - 运行上述脚本
  conda activate mv_render
  chmod +x convert_bin_to_ply.py
  python convert_bin_to_ply.py
- 以
- 准备保存中间/最终结果的文件夹
- 准备存放点云表面重建结果的文件夹,如
ScanObjectNN_plyn_files_recon - 准备存放最终mesh的文件夹,如
ScanObjectNN_obj_files
- 准备存放点云表面重建结果的文件夹,如
- 准备批量处理点云的脚本
-
脚本命名为
convert_ply_to_obj.sh,具体实现参考 批量处理脚本章节 -
运行上述脚本
  conda activate mv_render
  chmod +x convert_ply_to_obj.sh
  ./convert_ply_to_obj.sh
-
- 若点云只包含点的坐标,不包含法向量,需要用 MeshLab 计算每点法向量
批量处理脚本
将 .bin 原始数据转换为 .ply 点云格式 -> convert_bin_to_ply.py
1
2
3
4
5
6
7
8
9
10
11
12
13
14
15
16
17
18
19
20
21
22
23
24
25
26
27
28
29
30
31
32
33
34
35
36
37
38
39
40
41
42
43
44
45
46
47
48
49
50
51
52
53
54
55
56
57
58
59
60
61
62
63
64
65
66
67
68
69
70
71
72
73
    # 把 .bin 文件转换成 .ply,除了点坐标,点云坐标带法向量

    import os
    import struct
    import numpy as np
    from plyfile import PlyData, PlyElement

    def convert_bin_to_ply(bin_file, ply_file):
        count = 0
        with open(bin_file, 'rb') as f:
            while True:
                if count == 0:
                    # NOTE please refer to the github repository of scanobjectnn to check the format of .bin file
                    # according to the scanobjectnn, the first number in .bin is `the number of points` in `float32` format, which has 4 bytes
                    data = f.read(4)
                    npoints = struct.unpack('f', data)  # `npoints` is a tuple, which has one element

                    vertex = np.zeros(int(npoints[0]), dtype=[('x', 'f4'), ('y', 'f4'), ('z', 'f4')])
                    x_coors, y_coors, z_coors = [], [], []
                    nx, ny, nz = [], [], []
                    count = 1
                    continue

                else:
                    # according to the scanobjectnn, the following numbers in .bin are 11 `float32` numbers, which has 44 bytes
                    data = f.read(44)

                    if len(data) != 44:
                        break
                    point = struct.unpack('fffffffffff', data)
                    x_coors.append(point[0])
                    y_coors.append(point[1])
                    z_coors.append(point[2])
                    nx.append(point[3])
                    ny.append(point[4])
                    nz.append(point[5])

        x = np.array(x_coors)
        y = np.array(y_coors)
        z = np.array(z_coors)
        nx = np.array(nx)
        ny = np.array(ny)
        nz = np.array(nz)

        vertex = np.core.records.fromarrays([x, y, z, nx, ny, nz],
                                            names='x, y, z, nx, ny, nz',
                                            formats='f4, f4, f4, f4, f4, f4')

        vertex_element = PlyElement.describe(vertex, 'vertex')

        # Create the PlyData object with the vertex element
        plydata = PlyData([vertex_element])

        # Write the PlyData to the .ply file
        plydata.write(ply_file)

        print(f'Conversion complete. {bin_file} converted to {ply_file}.')

    if '__main__' == __name__:
        data_dir  = '/mnt/sdb/public/data/common-datasets/ScanObjectNN_3_variants'
        ply_dir = '/mnt/sdb/public/data/common-datasets/ScanObjectNN_plyn_files'

        for cls in os.listdir(data_dir):
            cls_dir = os.path.join(data_dir, cls)
            if os.path.isdir(cls_dir):
                for f in os.listdir(cls_dir):
                    if f.endswith('.bin') and '_part' not in f and '_indices' not in f:
                        bin_file = os.path.join(cls_dir, f)
                        fname = f.split('.')[0]
                        ply_file = os.path.join(ply_dir, f'{fname}.ply')

                        convert_bin_to_ply(bin_file, ply_file)
将 .ply 点云转化为 .obj 格式的 mesh -> convert_ply_to_obj.sh
1
2
3
4
5
6
7
8
9
10
11
12
13
14
15
16
17
18
19
20
21
22
23
24
25
26
27
28
    #!/bin/bash

    # Input directory containing PLY files
    ply_directory="ScanObjectNN_plyn_files"

    # Output directory for reconstructed PLY files
    reconstructed_directory="ScanObjectNN_plyn_files_recon"

    # Output directory for OBJ files
    obj_directory="ScanObjectNN_obj_files"

    # Iterate over the PLY files
    for ply_file in "$ply_directory"/*.ply; do
        # Set up output file paths
        filename=$(basename "$ply_file")
        base_name="${filename%.*}"
        reconstructed_ply_file="$reconstructed_directory/$base_name.ply"
        obj_file="$obj_directory/$base_name.obj"

        # Reconstruct surface using meshlabserver
        meshlabserver -i "$ply_file" -o "$reconstructed_ply_file" -s poisson_surface_reconstruct.mlx

        # Convert reconstructed PLY to OBJ using meshlabserver
        meshlabserver -i "$reconstructed_ply_file" -o "$obj_file"

        echo "Converted: $ply_file -> $obj_file"
    done